I have been continuing my journey of casting slot car bodies and being able to create a quality body on a consistent basis. So I started looking into pressure casting the bodies. Again it has been a learning experience but for me I am able to produce a better body
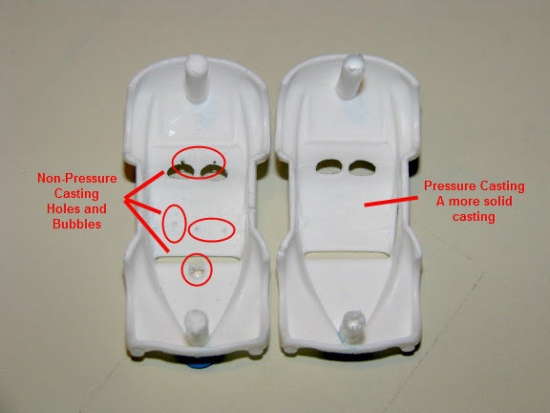
The problem I was having was with air bubbles. Apparently there are two trains of thought on how to remove or reduce air bubbles in resin casting. One is to remove the bubbles using a vacuum; the other is to make the bubbles so small you cannot see them with the naked eye by using pressure. I chose the second. In the picture to the right you can see the results of what I am talking about. The body on the left is the result of a non-pressure casting. Notice the bubbles within the circles. The body on the right is the result of a pressure casing. That casting is considerably more solid especially if you look at the bodies with a light behind it. (Sorry could not show you that… did not have enough hands to take the picture)
The problem I was having was with air bubbles. Apparently there are two trains of thought on how to remove or reduce air bubbles in resin casting. One is to remove the bubbles using a vacuum; the other is to make the bubbles so small you cannot see them with the naked eye by using pressure. I chose the second. In the picture to the right you can see the results of what I am talking about. The body on the left is the result of a non-pressure casting. Notice the bubbles within the circles. The body on the right is the result of a pressure casing. That casting is considerably more solid especially if you look at the bodies with a light behind it. (Sorry could not show you that… did not have enough hands to take the picture)
*** CAUTION*** Please read:
When using pressurized air you need to be extremely careful and treat it with the utmost respect. Being careless can cause extreme injury and possibly death if the tank ruptures. If you choose to build one of these tanks proceed at your own risk!!
When using pressurized air you need to be extremely careful and treat it with the utmost respect. Being careless can cause extreme injury and possibly death if the tank ruptures. If you choose to build one of these tanks proceed at your own risk!!
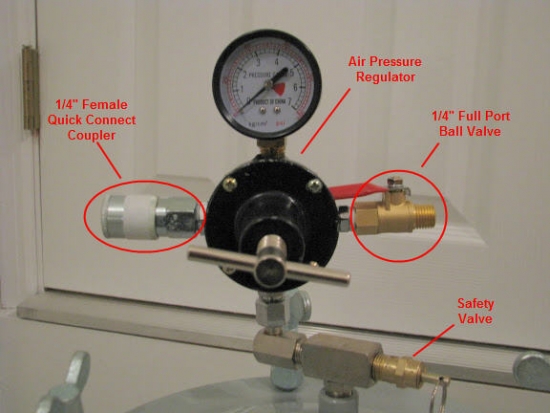
After some research on the webbernet through posts and videos, I built a pressure chamber using a pressure paint tank that I got from Harbor Freight. You can see it here. I got mine on sale for 60.00 USD. I had to buy three additional parts they include a female automotive coupler, and a full port ball valve, both were purchased at Harbor Freight. I also purchased a square head pipe plug at the local home center. Total I have about 70.00 USD in this project. In the picture below you can see two of the parts I purchased, the coupler and the ball valve. Everything else came with the pressure paint tank.
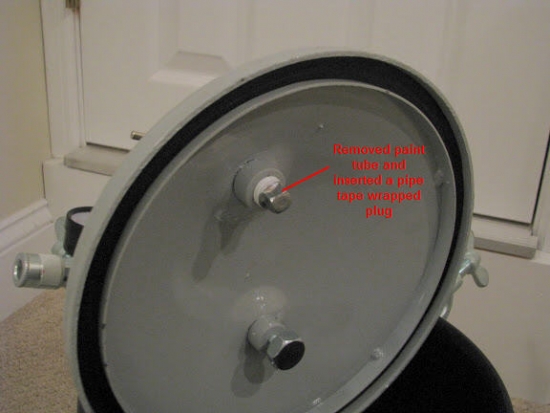
In the jjpicture below you will see the third part I purchased, the pipe plug. Please note that I had to remove a paint feed tube and then plug the hole with the pipe plug.
Important note, I used plumbing tape on all threaded connections to ensure a tight seal.
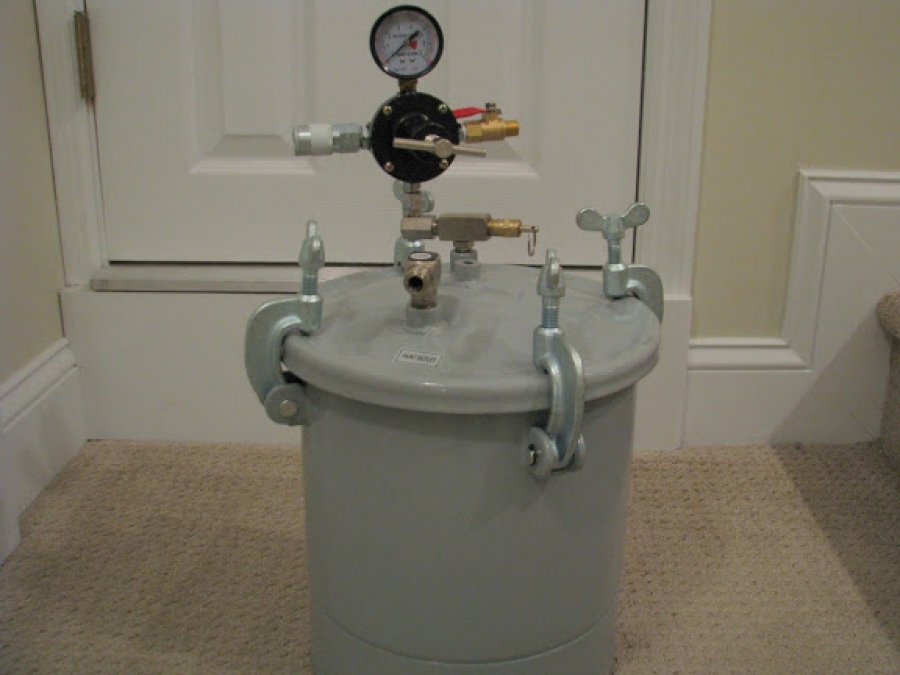
Extremely important note, when tightening down the pressure tank lid hand tighten and use a tighten sequence much like you would a cylinder head on an engine. I put the lid on and then I snug the wing nuts at the 12 and 6 positions then the 9 and 3 positions. After that I snug the wing nuts again starting with the 12 position and work my way around to the 3, 6, and finally the 9 position. And finally I repeat the first tightening sequence except I start with the 3 and 9 positions and then the 12 and 6 exactly opposite sequence. During each sequence you will feel the lid get tighter. For good measure continue to alternate the sequences until you can no longer hand tighten the wing nuts.
I put a board in the bottom of the tank so the mold would sit level in the tank.
After pouring the resin into the mold, I quickly put the mold and resin in the tank. I then tighten the lid of the tank using the tightening sequence above. Close the port ball valve. The tank should now be sealed
When the lid is on tightly, connect your air compressor to the quick connect coupler. Set your outgoing air pressure on your compressor to about 50 PSI. Then on the paint tank regulator set your pressure to 40 or 45 PSI. Once this is dialed in you can remove the air connection to the compressor. If the tank is completely sealed it should hold the air pressure until you release the air pressure off the tank using the full port ball valve. Make sure you open this valve and release all the pressure before removing the lid!
How long should the tank stay sealed? That depends on the cure time of your resin.
Things I have learned:
Before you actually do a casting I would perform several dry runs using the above steps so that you will feel comfortable pressurizing the tank. Do not forget to release all the pressure from the tank before removing the lid!!
If you are going to pressure cast you will also have to cast your mold under pressure. If you use a non-pressure cast mold and then pressure cast the resin chances are your casting will have little bumps all over the surface.
When using pressurized air you need to be extremely careful and treat it with the utmost respect. Being careless can cause extreme injury and possibly death if the tank ruptures. If you choose to build one of these tanks proceed at your own risk!!
I am just covering the bases.
 RSS Feed