| Some of you might remember this article by Dave Parker that he posted on the HO World Site several years back. Unfortunately that site is now gone... however, Dave has consented to let me post his article here on HOSlotcarz.com. If you're interested in building a trailer then click the read more link below. | 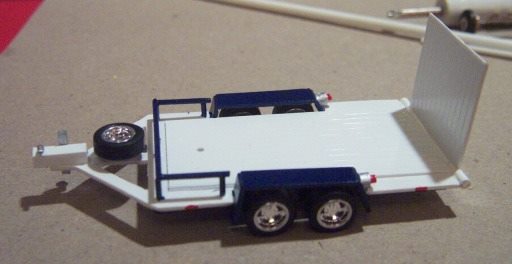 |
The above photo is an example of several trailers I have built for my t-jets. It’s a fairly simple project, and requires only basic modeling skills (and a little imagination). Except for the wheels, these trailers are made entirely from styrene stock available at most hobby stores (check the train section). Styrene is great to work with… it comes in a zillion shapes and sizes, it is easy to cut and shape, and welds easily. Notice I said ‘welds’… you don’t really glue styrene; you weld it using any of several liquids available for this purpose. See the list of materials at the end of this article for a list of styrene part #’s and bonding fluids you can use for this project.
OK, let’s build a trailer. Let me say up front that you won’t find any blueprints or measurements in this article… each trailer was built from scratch and I adjusted as I went. Styrene is so easy to work with you really don’t need to worry about exact measurements. So first, select a t-jet you want to use as a guide for size. Then, using a sheet of .010 styrene, cut out a template for the floor of the trailer that is long enough and wide enough to carry the car. I use the thin sheet for this as it is much easier to cut and make adjustments. You want the car to fit between the fender cutouts and also make sure the rear of the trailer extends past the rear bumper of the car so the tailgate will go all the way up. Figure 1 shows a shape I like to use, but here and throughout the process feel free to improvise. Figure 2 shows the template transferred to the thicker .040 sheet actually used as the trailer.
OK, let’s build a trailer. Let me say up front that you won’t find any blueprints or measurements in this article… each trailer was built from scratch and I adjusted as I went. Styrene is so easy to work with you really don’t need to worry about exact measurements. So first, select a t-jet you want to use as a guide for size. Then, using a sheet of .010 styrene, cut out a template for the floor of the trailer that is long enough and wide enough to carry the car. I use the thin sheet for this as it is much easier to cut and make adjustments. You want the car to fit between the fender cutouts and also make sure the rear of the trailer extends past the rear bumper of the car so the tailgate will go all the way up. Figure 1 shows a shape I like to use, but here and throughout the process feel free to improvise. Figure 2 shows the template transferred to the thicker .040 sheet actually used as the trailer.
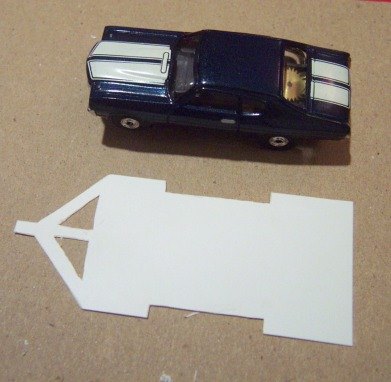
Figure 1
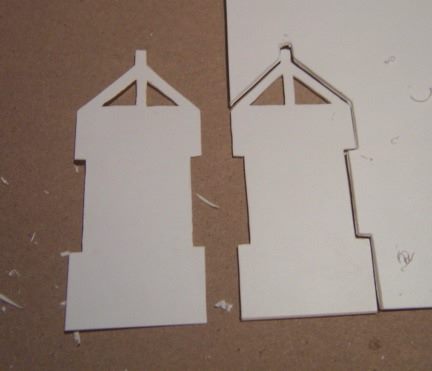
Figure 2
Note: the thicker sheet can be harder to cut. You can score the styrene and snap it for straight cuts, but for the curves you will need to cut through. My technique was to use a scribing tool (Squadron makes a good one), and scribe all the way through. Time consuming, but safer than trying to use an X-acto knife. A Dremel would probably be faster as well. Once you have the trailer cut out, one side will probably look better than the other… use that side as the top. Any miss-cuts or scratches can normal be rubbed over or filled with a little white body putty.
Once you have the trailer cut out, the rest is easy. The first thing I like to do is add a couple of rails under the trailer for rigidity and to use as a mounting point for the axles and wheels. Cut a couple of 1/8” square pieces that are the length of your trailer, and weld them to the bottom of the trailer and aligned along the inside edge of the cut-out. To ‘weld’ styrene, just hold the two pieces together and run a little liquid along the joint. In two or three seconds, you will have a completed weld. Easy! Next, I cut out a couple of strips of .040 board and batten styrene to use as the fenders. You can also use stock .020 sheets for this. To make the bends, I scribe the inside of the bend to remove a little material first. You will have to play with the styrene a bit to find a length that works for you. Once you have one good fender, use it as a template to make others. Trim the front and rear edges of the trailer cutout to match the angle of the fender for a flush fit, and trim any excess material on the inside edge so the bottom rail is flush with the edge, then weld the fender. The result should look like figures 3 and 4.
Once you have the trailer cut out, the rest is easy. The first thing I like to do is add a couple of rails under the trailer for rigidity and to use as a mounting point for the axles and wheels. Cut a couple of 1/8” square pieces that are the length of your trailer, and weld them to the bottom of the trailer and aligned along the inside edge of the cut-out. To ‘weld’ styrene, just hold the two pieces together and run a little liquid along the joint. In two or three seconds, you will have a completed weld. Easy! Next, I cut out a couple of strips of .040 board and batten styrene to use as the fenders. You can also use stock .020 sheets for this. To make the bends, I scribe the inside of the bend to remove a little material first. You will have to play with the styrene a bit to find a length that works for you. Once you have one good fender, use it as a template to make others. Trim the front and rear edges of the trailer cutout to match the angle of the fender for a flush fit, and trim any excess material on the inside edge so the bottom rail is flush with the edge, then weld the fender. The result should look like figures 3 and 4.
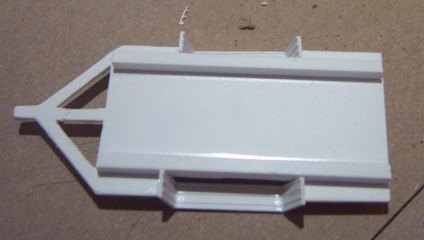
Figure 3
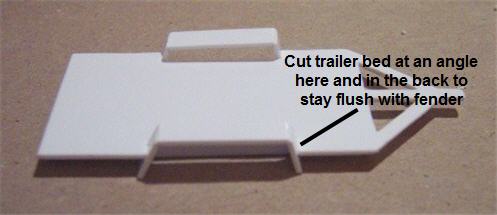
Figure 4
Now let’s fit the car on the trailer. Look OK? For a realistic looking deck, cut a piece of V-groove sheet that fits as a bed liner and weld it to the deck. This stuff looks like boards. Then add a rail around the front. Drill a few 3/64” holes around the front (by hand). Cut some 3/64” rod sections (about ½” long) and stick them in the holes. Turn the trailer upside down and push the rods until they just touch your work area to ensure they all stick out at the same height. Touch a bit of weld to one rod, and then quickly make sure it is aligned straight. Once the weld sets, move on to the next rod (figures 5 and 6). After welding all the rods, snip off the excess flush with the bottom.
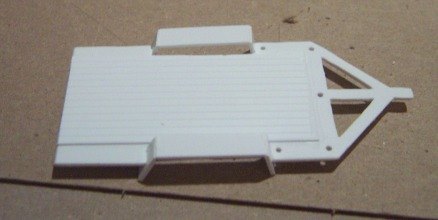
Figure 5
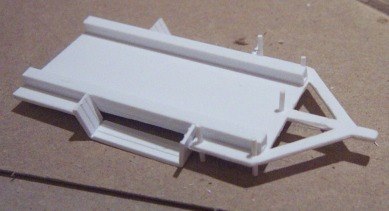
Figure 6
Now we will add the wheels. I have a bunch of JL pullback chassis’ on the bench, so I used the wheels off of them. Any wheels and tires will work though, as long as they will fit within the fender you put on. Align the wheels against the inside rail to get an idea of where your axles will go through. Remember to align both wheels at the same time so you can check the spacing between them. Once you know where you want your wheels, hand drill a hole the same diameter as your axles through the rails on each side, making sure that the holes align and that each is the same distance from the bottom edge (or your trailer will tilt forward or back). Then super glue (styrene weld won’t work on the wheel) an extra-long axle (JL wheels will take the 1/16” styrene) into two wheels and slip the axles through to check for fit (figure 7).You can mount the other two wheels to see how they look, but DO NOT glue them on yet… wait until after painting. Trim the axles a little at a time until you get the wheels to a point where they are close to, but not touching, the rails. To finish up the trailer, add the rest of the details. First, add some 3/64 rods to the top of the posts put in earlier. (Tip: cut the rods extra long, weld them across the tops of the posts, then snip the excess). To the front, add a short section of the 1/8 square beam to simulate hydraulic brakes and a trailer hitch. You can also start on the tailgate. Take a short section of the v-groove cut to the same width as the liner and weld a 3/64 rod across one end (again, the rod should be extra wide and will be cut to fit later). Fit a short tube section over each end, hold the tailgate against the rear of the trailer, and cut the tubes to fit. Take one tube off, and weld it in place on the end of the trailer (fig8). Whew! We’re almost done!
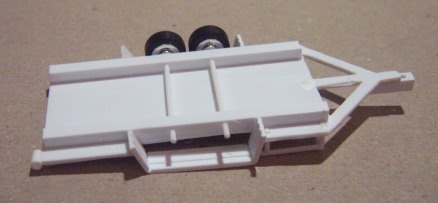
Figure 7
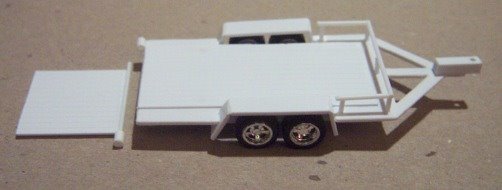
Figure 8
Once the first tube sets up, slide the tailgate assembly into that tube and align the other tube (still on the rod) against the end of the trailer deck. Touch a small amount of weld against the joint formed between the tube and the trailer. BE VERY CAREFUL! The weld will wick itself through the joint, and may try to work inside the tube. If this happens, the tailgate won’t raise or lower. Once the weld sets, gently swing the tailgate back and forth to check for freedom of motion. If the tube breaks free, you can always start over.
You could stop right now if you wanted to. Figures 9-11 show some additional details I added to this trailer. I used a small section of 3/64 rod, bent at an angle, as a hitch lock. I also inserted a small diameter rod into a tube, cut them at an angle, and welded them on the rear of each fender as lights. You will have to play with the cut a bit to get it to fit the angle of your rear fender. And finally I cut some small square and round rods, welded them to the front, added a very small piece of tube over the rod, and made myself a jacking point with a wheel.
You could stop right now if you wanted to. Figures 9-11 show some additional details I added to this trailer. I used a small section of 3/64 rod, bent at an angle, as a hitch lock. I also inserted a small diameter rod into a tube, cut them at an angle, and welded them on the rear of each fender as lights. You will have to play with the cut a bit to get it to fit the angle of your rear fender. And finally I cut some small square and round rods, welded them to the front, added a very small piece of tube over the rod, and made myself a jacking point with a wheel.
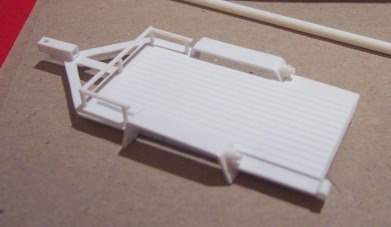
Figure 9

Figure 10
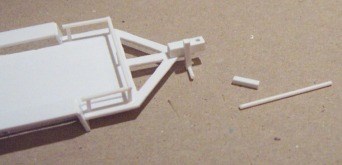
Figure 11
The final picture shows the final result after painting. This one was for a Trans Am Camaro, so I used the same White/Blue paint scheme. The running lights are just dabbed on with red paint. I used silver to accent a few pieces, and also mounted a spare wheel on a short shaft, drilled a hole in the center beam, and glued on the spare. Don’t forget to drill a small hole for your car’s guidepin.

Materials used in this project:
Evergreen #217 – Rod and Tube Assortment (this has all various sizes used)
Evergreen #9008 – Sheet assortment (.010, .020, .040)
Evergreen #2080 – V-groove sheet (.020) (for optional bed liner)
Evergreen #252 – 1/8” square beams
Evergreen #4542 – Board and batten (optional for fenders)
Some Styrene welding liquids:
Ambroid Proweld, Plastruct Bondene, Tenax 7R, Testors Liquid Cement
(I like the Plastruct and Ambriod since they come with an applicator)
Wheels – JL pullback (or any other HO scale wheel)
Optional materials:
Evergreen #221 – 3/64” rod (comes in #217 but you can always use more)
Evergreen #222 – 1/64” rod (same thing here)
Evergreen #267 – Channel (used for ramps and tire rails on the black/gold example)
Evergreen #8606 – 6x6 scale solid square (for trailer jack)
I would like to thank Dave Parker for allowing me to post his article. If you would like to download his original article then see download below.
| daveparkertrailerarticle.pdf |
 RSS Feed