
When building a competitive car you should use matched magnets... sounds simple enough... pull out the magnet matcher or gause meter and start measuring magnets until you find a matching reference number (if using a magnet matcher) or a matching gause reading on two magnets (1 north, 1 south). Well this is what I thought until Greg Wisniewski explained the "finer points" of magnet matching. The image to the right is what started it all. I would like to thank Greg Wisniewski for sharing this with me and you who are reading this should thank him for allowing me to share it with you.
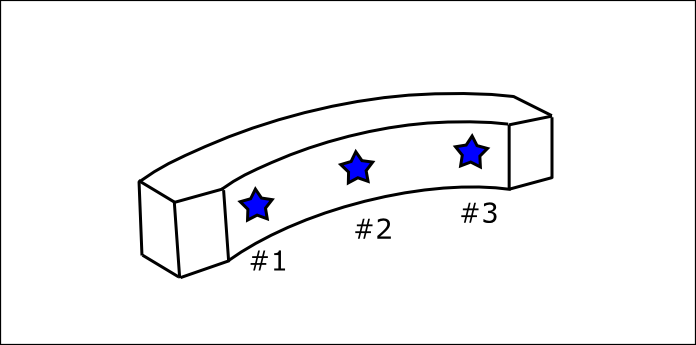
The above image is what Greg sent me. There are basically three areas to measure in each magnet... #1 is the leading position, #2 is the center position, and #3 is the trailing position. The center position will have a matched reading with the other magnet. Now take each magnet separately and take a reading on the leading and trailing positions and record these readings. Turn the magnet over (up side down) and and repeat the process and record the leading and trailing readings. In the diagram below the stars indicate where to measure each magnet.
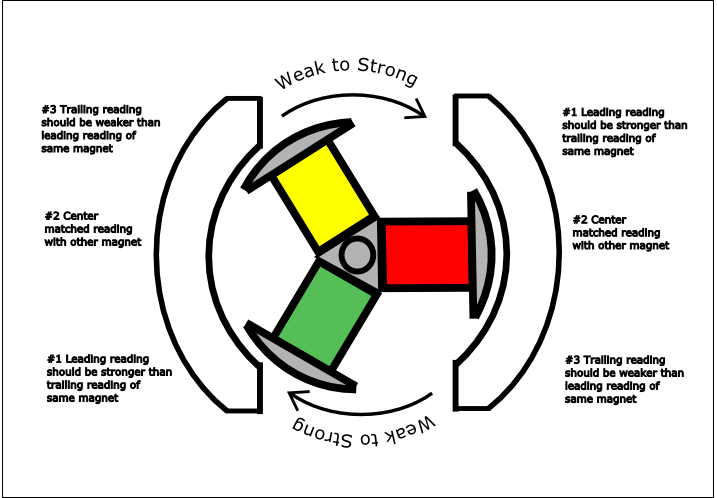
Repeat this process for each magnet and match the best you can. What you are ultimately after is a strong leading reading #1 a #2 reading that matches the other magnet and a #3 trailing reading that is weak.
For me, the above information really opened my eyes to the concept the Greg was trying to convey. Not only was it important to have a matching magnetic field in the center of the pair of magnets, but you were also using a weak to strong magnetic attraction on the ends of the paired magnets to help spin the armature faster when each pole of the armature was moving from one magnet to the other. (See Diagram Below)
Now Greg didn't stop there... there's more!! If you recall in reading the above paragraphs you were told to flip the magnet over and take the readings and record them. Chances are the reading will not be identical. There will be a difference between the top and the bottom measurement. When possible put the stronger side down. This is particularly helpful when building a chassis that is low to the track... for example a fray car.
Greg also indicated that this was just the start... that each armature had it's own likes and dislikes and that you would need to experiment on the track or with a dyno. Some armatures like a weak #2, some like a mid-range #2 and some liked a strong #2.
Some general characteristics:
Dash magnets stronger on the leading
JL and AW magnets were stronger in the center
Once again I would like to thank Greg Wisniewski for sharing and letting me share!!! :-)
 RSS Feed